NTFS vs exFAT vs FAT32: What is the Difference and How to Choose the Right Format

A NAS power failure does not always mean your files are gone. In many cases, the disks still contain the original data, but the NAS can no longer assemble the storage pool, replay the filesystem journal, or mount the shared folders correctly.

 Table of Contents
The dangerous part starts after the power comes back.
A Synology, QNAP, ASUSTOR, TerraMaster, Buffalo, or WD NAS may ask to initialize drives, repair a volume, rebuild RAID, check the filesystem, or create a new storage pool. Some of these actions are safe in the right situation. Others can overwrite metadata that recovery software needs to reconstruct the original volume.
If the NAS contains valuable data, do not initialize, format, rebuild, expand, reset, or reinstall the system until you understand what failed. The safest recovery strategy is to preserve the original disks first, then reconstruct the RAID and filesystem in read-only mode.
This guide explains what actually happens during a sudden shutdown, why a NAS may stop showing files after a power outage, which symptoms are dangerous, and how to recover data without making the damage worse.
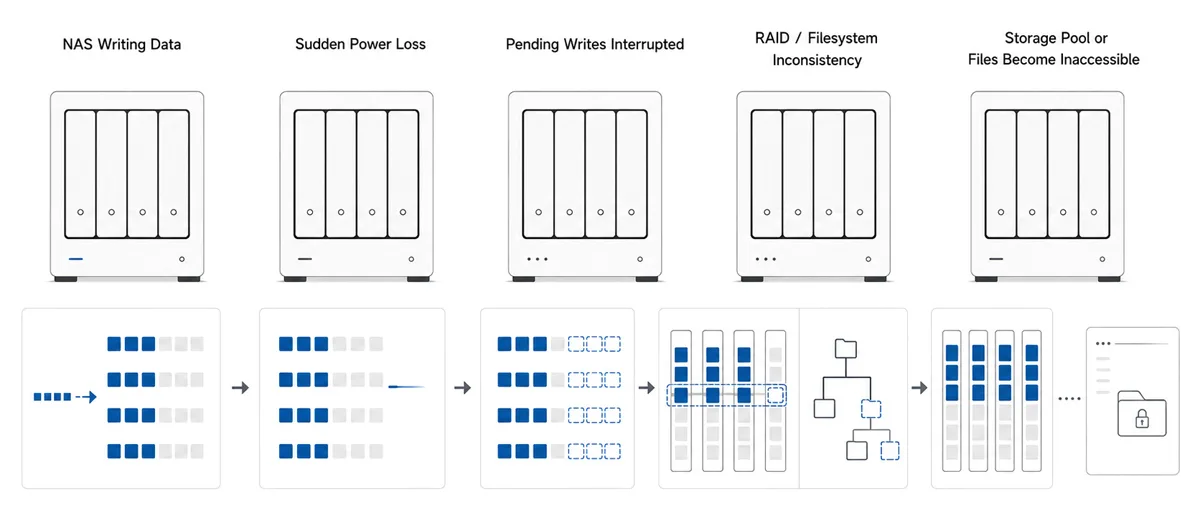
A NAS is constantly writing small pieces of information even when you are not actively copying files. It updates access logs, thumbnails, indexes, databases, RAID metadata, filesystem journals, snapshots, user permissions, and shared folder records. When power disappears in the middle of these operations, the system may shut down before all pending changes reach the disks.
The outage itself is not always the main problem. The real issue is interruption during a write operation.
A NAS usually has several layers between your file and the physical disks:
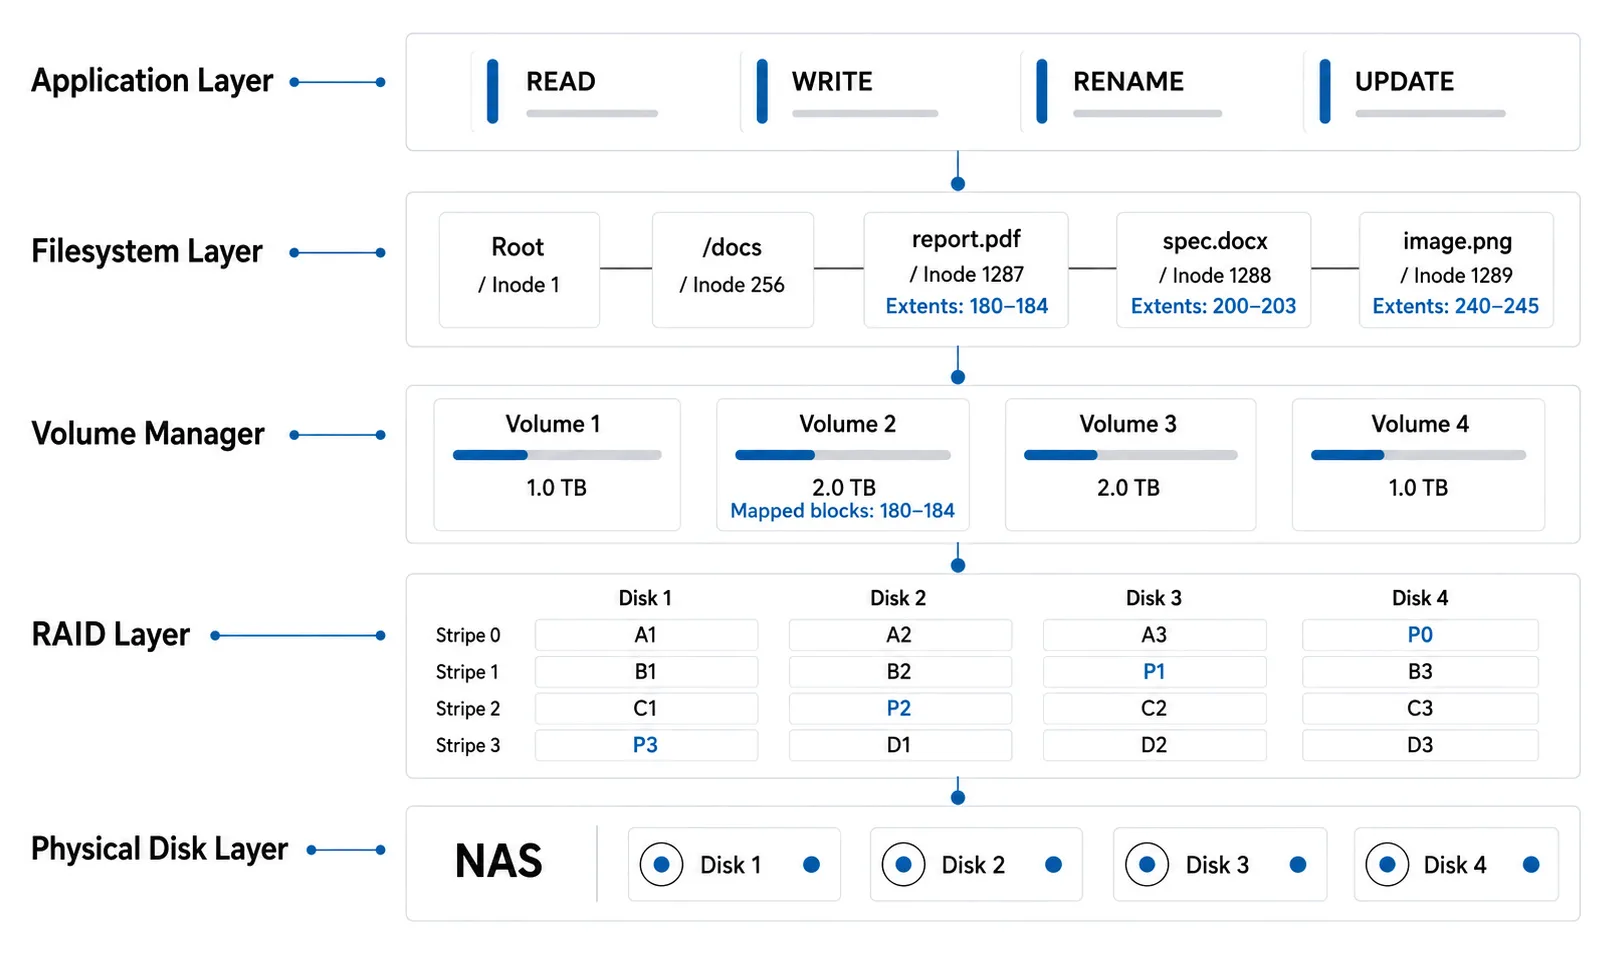
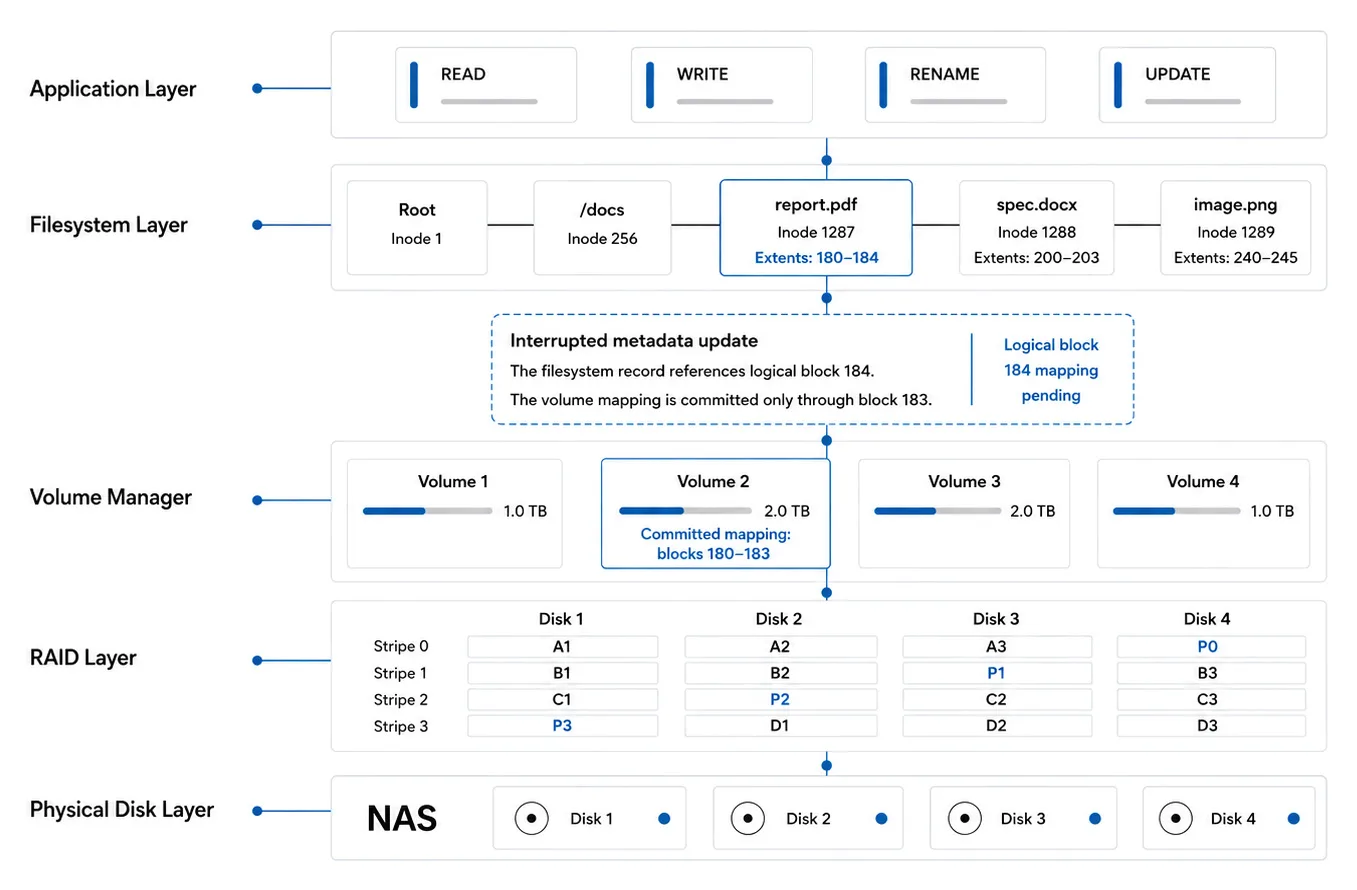
If power fails while one layer has recorded a change and another layer has not, the NAS may come back in an inconsistent state. The data can still be physically present, but the system may not know how to connect all pieces correctly.
For example, the filesystem may record that a file uses logical blocks 180–184, while the volume manager commits mappings only for blocks 180–183. Block 184 may still exist on the disks, but the storage layers no longer agree about where it belongs.
A dirty shutdown means the NAS stopped without closing filesystems and services properly. During a normal shutdown, the operating system flushes write cache, stops services, writes metadata, unmounts volumes, and parks operations in a controlled order.
During a sudden outage, that order is broken.
After restart, the NAS may try to replay the filesystem journal. A journal is a record of recent filesystem operations that helps restore consistency after interruption. On ext4, journaling helps the system recover metadata state. On Btrfs, copy-on-write and checksums add another layer of protection, but they do not make the system immune to incomplete writes, damaged metadata trees, or storage pool problems. On XFS, metadata journaling helps recover structure, but severe interruption can still leave the volume unmountable.
The key point is simple: journaling improves crash recovery, but it is not a backup and not a guarantee that every interrupted operation will be harmless.
Many NAS systems use write cache to improve performance. Instead of writing every operation directly to disk immediately, the system may temporarily hold data in memory and flush it later.
This is normal behavior. It is also why sudden power loss can be dangerous.
If a file was being copied, edited, renamed, moved, synced, or backed up at the moment of the outage, the NAS may have only part of the final state on disk. For example, a file record may exist, but the data blocks may be incomplete. A directory may point to files that were not fully written. RAID parity may not match the latest data.

In RAID 5 and RAID 6, interrupted writes can also create parity inconsistency, sometimes called the write hole in older or lower-end RAID implementations. RAID systems use parity to rebuild data after disk failure, but parity has to match the actual data blocks. If power fails while data and parity are being updated, the array may need a consistency check before it can be trusted.
When the NAS boots after a dirty shutdown, it may automatically run a filesystem check or replay journal entries. This can be safe when the damage is minor.
But there is a risk.
If the system misinterprets damaged metadata, has failing drives, or starts repairing a degraded RAID, automatic repair may remove orphaned entries, truncate files, mark blocks as free, or make the volume mountable at the cost of losing some directory structure.
That is why the safest approach depends on the value of the data.
If the data is not important, you may allow the NAS to perform its built-in repair. If the data is important, stop and make disk images first. Recovery should happen on copies or in read-only mode, not through forced repair on the only original disks.
A NAS can fail in several different ways after a power outage. The exact message depends on the vendor, firmware version, RAID type, filesystem, and disk health.
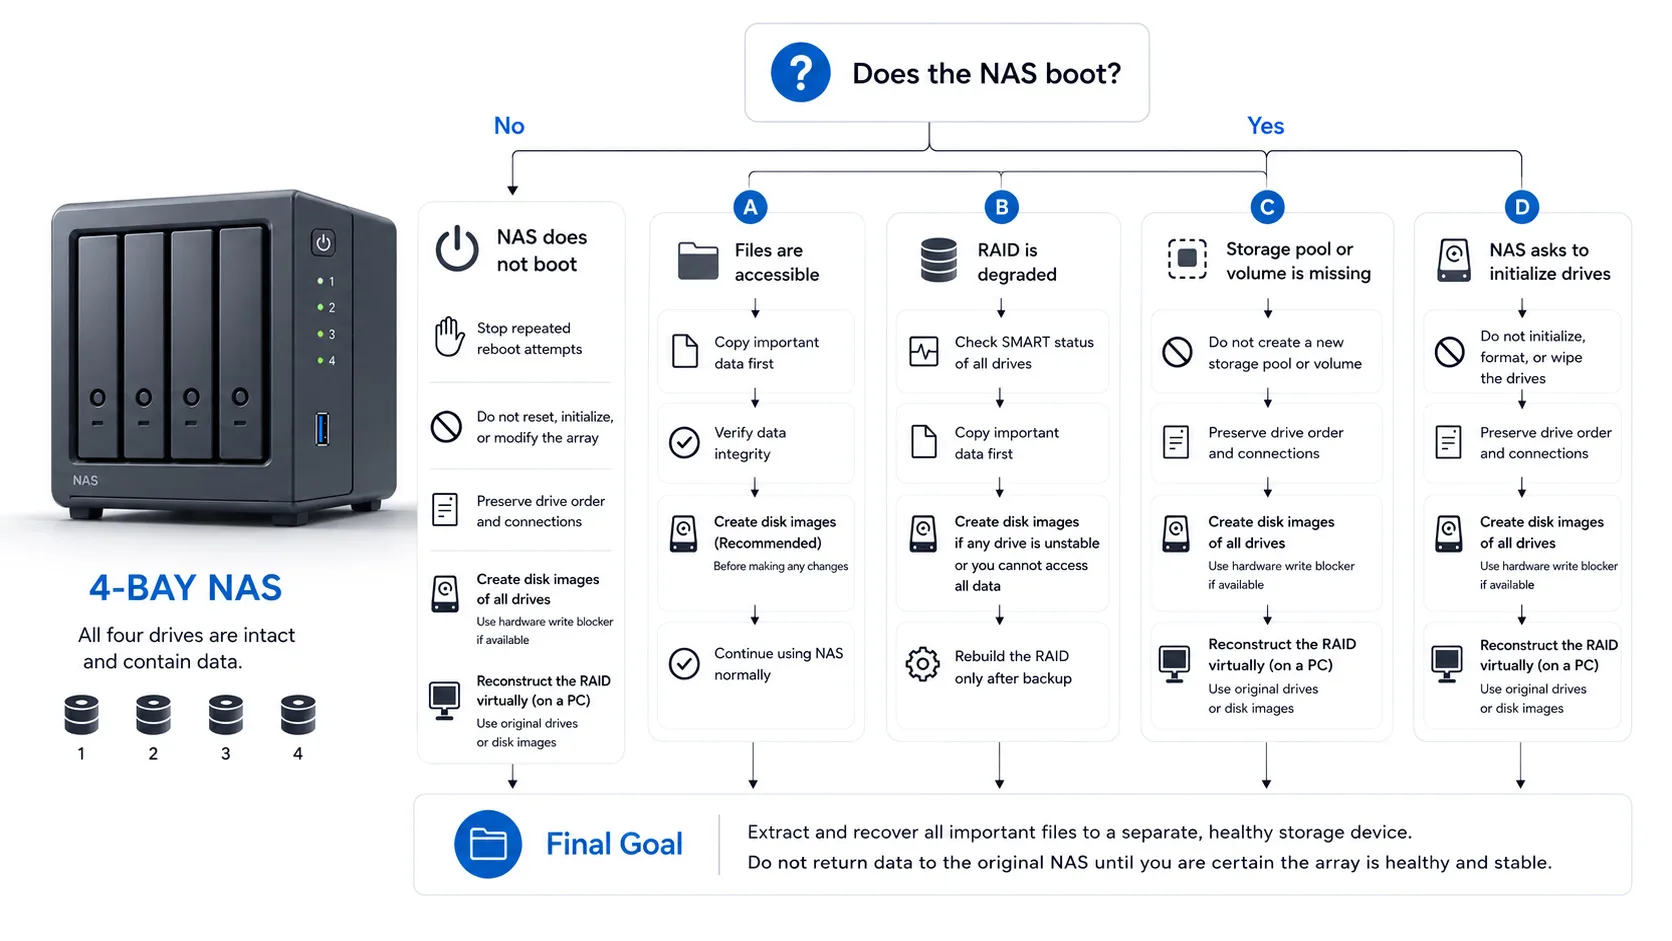
The symptom matters because each one points to a different failure layer.
The NAS may power on, but the web interface does not load. LEDs blink continuously. Fans spin. Drives start. The unit may be visible on the network for a few seconds and then disappear.
This can indicate firmware damage, system partition corruption, power supply issues, or a disk that prevents boot. Many NAS devices store parts of the operating system on internal flash and parts on small system partitions across the drives. If these partitions are damaged, the enclosure may fail to start even when user data partitions are still intact.
Do not assume the files are gone. A non-booting enclosure does not automatically mean damaged data.
This is one of the most dangerous symptoms.
If the NAS asks to initialize, create a new pool, format disks, or install the system from scratch, it may no longer recognize the existing RAID or volume metadata. The disks may look “new” to the firmware even though they still contain data.
Do not click initialize if you need the files.
Initialization can overwrite partition tables, RAID superblocks, volume metadata, or filesystem structures. Even a quick initialization may destroy information needed to reconstruct disk order, stripe size, parity rotation, LVM layout, or Btrfs metadata.
Correct action: power off the NAS, label the drives in their original bay order, and recover from the disks using read-only RAID recovery software.
A degraded RAID means the array has lost redundancy but may still be readable. For example, RAID 5 can usually keep working after one disk drops out. RAID 6 can usually tolerate two missing disks. RAID 1 can continue from one mirror member.
After a power failure, a disk may be marked failed even if it is not physically dead. The NAS may have lost communication during startup, detected timeout errors, or found metadata inconsistency.
The mistake is starting a rebuild immediately.
A rebuild writes heavily to all disks. If another disk has weak sectors, unstable heads, or pending read errors, the rebuild can fail and make the situation worse. If the wrong disk is selected as replacement, the NAS may overwrite useful data.
Before rebuilding, check disk health, preserve disk order, and consider imaging all drives.
Sometimes the NAS boots normally, but the storage pool is gone. The disks are visible. The web interface works. Users and network settings may remain. But shared folders are missing.
This usually means the operating system is alive while the data layer is not mounting.
Possible causes include:
This is often recoverable if the original disks are not modified.
Shared folders can disappear even when the volume is still partially present. The NAS may show used space, but no files. Or it may show the volume as mounted, while user folders are empty.
This can happen when directory metadata, permissions database, snapshot references, or share configuration files are damaged. It can also happen when the NAS mounts a fallback system volume but not the real data volume.
Do not recreate shared folders with the same names. Recreating folder structure may write new metadata over old references.
If files appear but some open damaged, the NAS may have completed only part of a write before power loss. This often affects files that were open during the outage: databases, virtual machines, Lightroom catalogs, video projects, archives, office documents, and backup containers.
Large files are more vulnerable because they remain open longer and may be written in many fragments.
In this situation, recovery is not only about finding filenames. It is also about finding the latest valid file versions, snapshots, previous blocks, or copies from backup jobs.
Many users describe every NAS problem as “RAID failure”. In reality, power loss may affect RAID, filesystem, or both.
Understanding the difference helps you avoid the wrong repair.
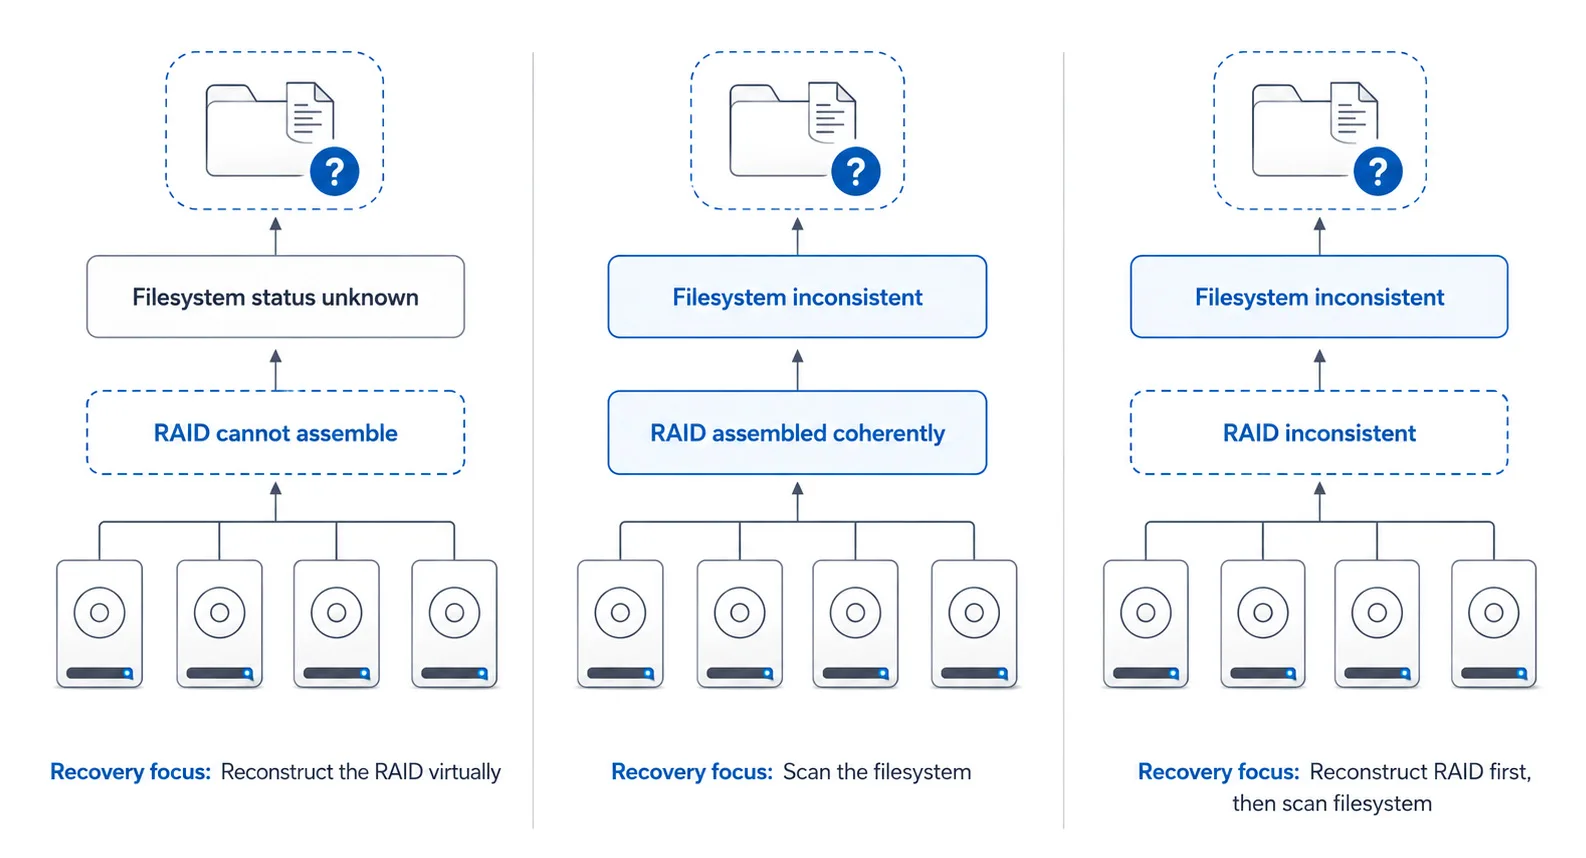
RAID metadata tells the system how physical disks combine into one logical volume. It may include RAID level, disk order, stripe size, parity layout, member IDs, event counters, and array state.
If RAID metadata is damaged, the NAS may not know how to assemble the disks. Windows may show several separate drives. Linux may show partitions but no mountable volume. The NAS may ask to initialize the pool.
In this case, the recovery task is to reconstruct the RAID virtually. Software must determine the correct disk order, RAID level, stripe size, offset, and missing members before filesystem recovery can begin.
Magic RAID Recovery is useful in this scenario because it can work with individual NAS drives, analyze RAID parameters, assemble a virtual RAID, and scan the resulting volume without writing to the source disks.
Filesystem metadata tells the operating system where files, folders, permissions, timestamps, and data blocks are located. On NAS devices, common filesystems include Btrfs, ext4, XFS, and ZFS-based layouts in some systems.
If filesystem metadata is damaged, RAID may assemble correctly, but the volume may not mount. The NAS may show a crashed volume, run a filesystem check, or display used space without folders.
In this case, the RAID layer may be fine. The recovery task is to scan the reconstructed volume and locate files through filesystem records, backup metadata, directory trees, or raw signatures.
Power failure can damage more than one layer. For example, a RAID 5 array may become degraded, while the Btrfs volume inside it also has metadata inconsistencies. Or a QNAP storage pool may be present, but the ext4 filesystem inside a logical volume may fail to mount.
This is why simple repair advice often fails.
A safe workflow must preserve the disks first, reconstruct storage layers in the correct order, and only then scan for files.
The first actions after a power outage often decide how much data can be recovered.
Initialization is not a recovery step. It is a setup step.
If the NAS asks to initialize drives after power failure, the safest assumption is that it no longer recognizes the previous storage configuration. Initializing may create new partitions, rewrite metadata, or prepare disks for a new pool.
That can permanently reduce recovery chances.
Creating a new pool writes new layout information. Even if the NAS says the disks are empty, they may not be empty. The firmware may simply be unable to read the old metadata.
A new pool can overwrite old RAID signatures, LVM records, Btrfs superblocks, ext4 structures, or XFS allocation data.
A rebuild is stressful. It reads from surviving disks and writes to the replacement disk for many hours. On large HDDs, this may take a long time.
If one more disk has weak sectors, the rebuild may fail. If the array was not correctly recognized, the rebuild may write incorrect parity. If the wrong disk is inserted or selected, useful data may be overwritten.
Before any rebuild, check SMART status, preserve bay order, and image disks if the data matters.
Filesystem repair tools can make a damaged filesystem mountable, but they do this by modifying metadata. They may remove damaged entries, move files to lost+found, clear inconsistent records, or discard structures they cannot safely interpret.
That is acceptable only after you have a backup or disk images.
Repeated reboots can trigger automatic checks, RAID resync attempts, log writes, package starts, indexing, thumbnail generation, and database updates. Each boot can write new data to the disks.
If the NAS contains important files and behaves abnormally, shut it down cleanly and stop experimenting.
Use this checklist before touching repair options.
The original NAS drives are evidence. Treat them like the only copy of the data until recovery is complete.
The safest recovery workflow depends on whether the NAS still mounts the volume.
If the NAS boots, the volume mounts, and files are visible, copy the most important data first. Do not start with firmware updates, RAID expansion, package upgrades, or full media indexing.
Copy priority should be:
After copying, check disk health and run vendor diagnostics. Only then consider filesystem checks, RAID scrubbing, or firmware updates.
If the RAID is degraded but files are visible, copy important data before rebuilding. A degraded array has no full redundancy. Another disk problem during rebuild may cause data loss.
After backup, check SMART attributes. Look for reallocated sectors, pending sectors, command timeouts, UDMA CRC errors, and abnormal temperatures.
If the disks are healthy, you can consider a vendor-guided rebuild. If any disk looks unstable, image the disks first.
If the NAS boots but the volume is missing, do not create a new one. Remove the disks only after labeling their order.
Connect the drives to a recovery workstation. Ideally, use SATA ports or stable USB-to-SATA adapters. Avoid unstable hubs. If possible, create full disk images.
Then use Magic RAID Recovery to analyze the member disks, detect RAID parameters, reconstruct the virtual array, and scan the filesystem. Save recovered files to another disk, never back to the NAS drives.
Stop immediately.
This usually means the NAS cannot read the existing configuration. The data may still be recoverable, but initialization can overwrite the metadata needed to recover it.
The correct workflow is:
Synology NAS devices commonly use Btrfs or ext4 on top of mdadm RAID and LVM, depending on model and configuration. Synology Hybrid RAID can combine disks of different sizes by building multiple RAID groups and presenting them as one storage pool.
After power failure, a Synology system may show:
If the device asks to initialize disks, do not proceed. If the pool is degraded but data is visible, copy files first. If the volume is crashed, recovery should focus on reconstructing the mdadm/LVM/Btrfs or ext4 stack outside the NAS.
QNAP NAS devices may use storage pools, static volumes, thick volumes, thin volumes, LVM, mdadm RAID, ext4, and in some newer systems ZFS-based QuTS hero.
After a power outage, users may see:
If the data matters, avoid forced filesystem repair before imaging disks. QNAP repair may help in minor cases, but it writes to the volume.
TerraMaster NAS systems often use Linux-based RAID and filesystems. After power loss, the NAS may show a degraded array, missing volume, or initialization prompt.
The same rule applies: do not rebuild or initialize until disk order and health are documented. If the system volume loads but shared data is gone, the user data partitions may still be recoverable through RAID reconstruction.
ASUSTOR devices can use RAID 1, RAID 5, RAID 6, RAID 10 and common Linux filesystems depending on setup. After power failure, the ADM interface may show inactive volume, degraded RAID, or disk errors.
Do not replace disks blindly. First determine whether the problem is a failed disk, damaged RAID metadata, or filesystem inconsistency.
Even when the disks are physically healthy, the wrong action can overwrite RAID metadata, filesystem structures, or recoverable file records. The table below explains the most common mistakes, why they are dangerous, and what to do instead.
| # | Mistake | Why It Is Dangerous | Safer Action |
|---|---|---|---|
| 1 | Initialize drives | Can overwrite RAID/filesystem metadata | Recover in read-only mode |
| 2 | Create new storage pool | Replaces old layout records | Preserve original disks |
| 3 | Rebuild immediately | Stresses weak disks | Check SMART and image drives |
| 4 | Format the volume | Destroys filesystem structures | Scan first, save elsewhere |
| 5 | Move disks to another NAS | New NAS may rewrite metadata | Use a recovery workstation |
| 6 | Change disk order | Breaks RAID reconstruction | Label every bay |
| 7 | Run filesystem repair blindly | Modifies damaged metadata | Work from images |
| 8 | Save recovered files to NAS disks | Overwrites source data | Save to another drive |
After a power outage, the safest assumption is not “the NAS is empty,” but “the NAS cannot currently understand its own storage layout.”
Magic RAID Recovery is most useful when the NAS no longer mounts the storage pool, asks to initialize drives, shows a degraded RAID, or presents the disks as separate devices on a PC.
The workflow is designed to avoid writing to the source disks:
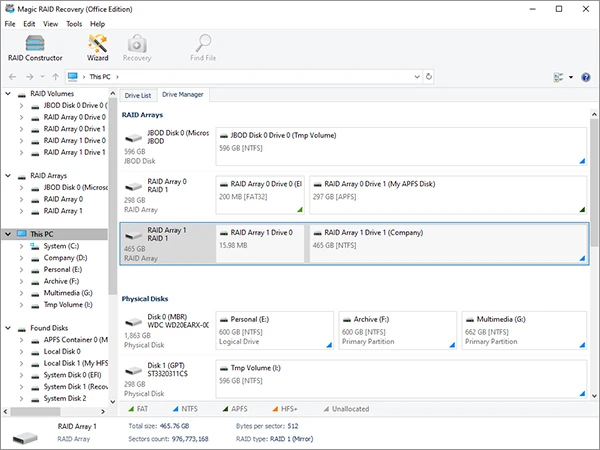
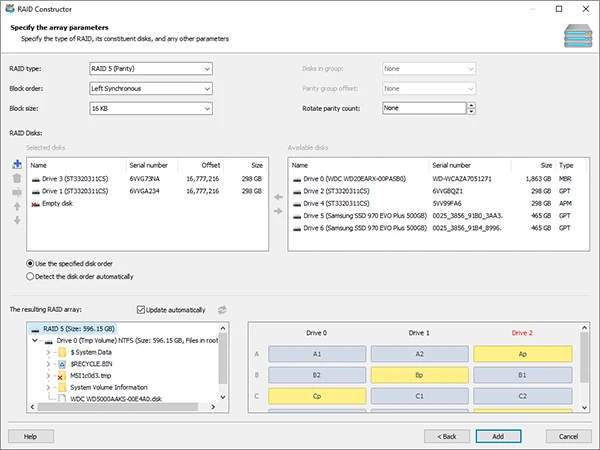
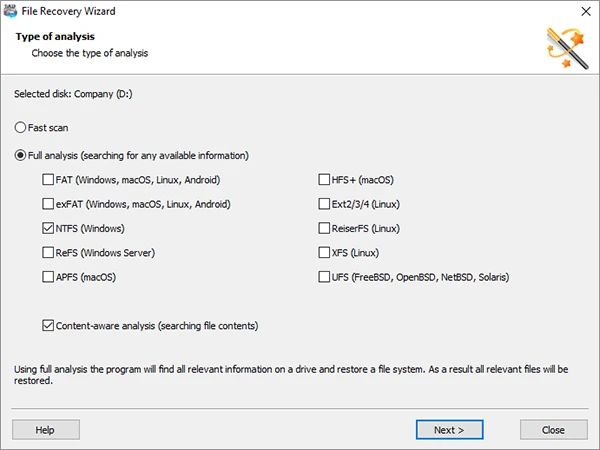
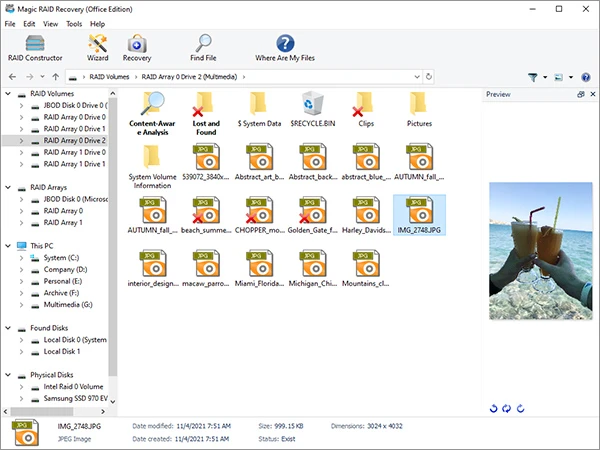
This matters because NAS recovery is not only “undeleting files.” In many cases, the software must first rebuild the logical storage stack: RAID, partition layout, volume manager, and filesystem.
For users recovering Synology, QNAP, ASUSTOR, TerraMaster, WD, Buffalo, RAID 5, RAID 6, RAID 10, SHR-like layouts, Btrfs, ext4, or XFS volumes, this read-only approach is safer than experimenting inside the NAS interface.
Built-in repair is not always wrong. It can help when the data is already backed up, the disks are healthy, and the NAS clearly identifies a minor filesystem inconsistency.
It becomes risky when:
A good rule: repair is for systems you can afford to lose. Recovery is for data you cannot afford to lose.
A NAS power failure is dangerous not because electricity disappeared for a few seconds, but because the system may have stopped while writing RAID metadata, filesystem records, databases, snapshots, or shared folder information.
The most important rule is simple: do not initialize, format, rebuild, or repair blindly.
If the NAS still mounts, copy your most important files first. If the RAID is degraded, check disk health before rebuilding. If the volume is missing or the NAS asks to initialize, stop using the enclosure and recover from the original drives in read-only mode.
Magic RAID Recovery can help reconstruct the RAID, scan NAS filesystems, preview recoverable files, and save them to another storage device without writing to the source disks.
If your NAS stopped working after a power outage, start with safe recovery, not repair. Connect the NAS drives to a PC, scan the array in read-only mode, and check whether your files are recoverable before making any changes to the original disks.
Download Magic RAID Recovery and scan the original drives in read-only mode.

Stanislav is a leading IT specialist, software developer and the founder of EIS company. On the pages of the blog, he shares his experience in the field of data recovery and solving other problems associated with loss of information.
Frequently Asked Questions
Quick answers to common questions about this topic.
Usually, power loss does not physically destroy the NAS or all disks. The more common problem is interrupted writes, dirty shutdown, RAID inconsistency, or filesystem metadata corruption. The files may still be recoverable if the disks are not initialized or overwritten.
Yes, often. Synology NAS devices commonly use mdadm RAID, LVM, Btrfs, ext4, or SHR-style layouts. If the disks are not overwritten, recovery software can often reconstruct the storage layout and scan the volume.
Not immediately. First check disk health, preserve disk order, and copy or image the data if possible. A rebuild can fail if another disk has weak sectors.
Ext4 journaling helps restore filesystem consistency, but interrupted writes can still damage files, directories, or metadata. If the volume does not mount, avoid forced repair until disks are imaged.
Save recovered files only to another disk, external drive, server, or new NAS. Never save recovered files back to the original NAS drives.
The NAS may no longer recognize the previous RAID, storage pool, or filesystem metadata. Do not initialize if you need the data. Initialization can overwrite structures required for recovery.
Yes, in many cases. QNAP may use RAID groups, storage pools, LVM, ext4, or ZFS-based layouts depending on model. Avoid forced repair or new pool creation before recovering files.
Btrfs has copy-on-write and checksums, but it is not immune to dirty shutdowns, damaged metadata trees, failed storage pools, or disk errors. It reduces some risks but does not replace backup.
Windows may not understand NAS RAID, Linux partitions, Btrfs, ext4, XFS, or vendor-specific layouts. Do not format the drives when Windows asks. Use NAS-aware recovery software instead.
Top 5 Posts
View all posts



Comments